Going serverless, an introduction
What if I told you that you can get an API up and running in a couple of minutes. What if I told you that the deployed application will be running in both a development and a production environment where scaling is a non issue and where you only pay when your application is actually being used. Doesn’t that sound pretty great? This is the promise of serverless architectures.
For the last year I’ve been working on a project where we use this kind of architecture to create an IoT platform and not only have this made backend development fun for me again but it have fundamentally changed how I think about creating software. In a series of posts I’m going to take you through the experience of building a full application. Let’s start with an introduction.
What is serverless?
First of all, serverless is a really bad name. Not only because it both describes an architectural pattern, a specific framework and the company that makes that framework but also because it’s not even true. There is of course always a server somewhere so maybe serveradministrationless would be a better name but that’s not as catchy so let’s stick with serverless for now.
I don’t think there’s a strict definition of what serverless is and there have definitely been several services in the past that you might call serverless but what really caused serverless to take of was when people started using the term to talk about “Functions as a Service”. The idea is that as a developer you should have full control of the code behind your application but that is all you need to worry about. How the functions are actually executed is not important. Just focus on creating beautiful code and it will be run and scaled for you automatically.
A typical serverless function can look like this:
module.exports.hello = (event, context, callback) => {
  const response = {
    statusCode: 200,
    body: JSON.stringify({
      message: "Hello World! You're awesome!"
    })
  }

  callback(null, response)
}
If you can see through the weirdness of JavaScript this looks like a normal function that returns a Hello world message, why is this such a big deal?
As I hope this series will show you this turns out to be a great way to structure your application but what’s even better is that when you deploy this function it will cost you absolutely nothing until it’s actually used. If your service suddenly gains traction and gets widely popular it will scale automatically so all requests will be served super fast and you will only pay for the actual execution time.
Still not convinced? Let’s try it for real to give you an idea of what to expect.
Getting started
Just as pretty much every cloud provider has its own solution for running containers, many of them are starting to gain support for serverless architectures. I’ll get back to this in a later post but for now I’ll be focusing on AWS’ implementation called Lambda just because it’s the most mature solution and it also happens to be the one that I’ve been working with for the last year.
Preparations
Before we start you need to prepare a few things. You need to install Node.js version 4 or or later. You can write your code using other languages as well but the tool that we are going to use requires Node.js. You also need an AWS account. There is a free tier available for AWS and since Lambda is included in this you can do a lot before you need to pay any money.
The final step is to acquire the access key to AWS to deploy your functions. You should probably create a separate account and limit its permissions but to keep things simple we are going to use your root credentials (see this guide if you don’t want to do that). The access key can be found if you login, choose My Security Credentials from the top right menu. Choose Access Keys and Create New Access Key. Save this information, you will need it later.
Serverless, the framework
Now that we’re prepared, we can start creating our application. If you’re impatient, you can login to the AWS console, go to Lambda, choose Create a Lambda function, click through the wizard and paste the code above. Press Save and Test and it will run. That’s cool but not a very practical way of writing real applications so for this series I’m going to use a framework called Serverless.
Run the following command to install it:
npm install -g serverlessNow you need to allow Serverless to access your AWS account. Run the following command but substitute <YOURKEY> and <YOURSECRET> with the credentials you saved earlier.
serverless config credentials --provider aws
	--key <YOURKEY> --secret <YOURSECRET>
Now you’re ready to create your first project. I’ll be using the template nodejs in these posts but you can use python, java-gradle, java-maven, scala-sbt or csharp if you want to. To create a project in the current folder run the following command:
serverless create --template aws-nodejsThis will create a normal Node.js project and install its dependencies. The interesting parts can be found in handler.js that contains the actual function that we want to run and the file serverless.yml that contains the configuration that tells AWS how to deploy the function and how to trigger it. How should the function be triggered?
Events
Even if functions are the heroes of serverless architectures they still need to be triggered somehow. The trigger can be a lot of things; a message on a queue, an event from an IoT device or maybe another function. I’ll get back to these in a later post but for now we are going to use a normal HTTP request to trigger the function.
Open the file serverless.yml and locate the events section. Uncomment the following lines to instruct AWS to setup API Gateway to provide the GET endpoint /hello that calls the function.
events:
  - http:
      path: hello
      method: get
Next let’s deploy and run this.
serverless deployThis will take a couple of minutes since it creates a new stack on AWS and deploys the function. The next deployment will be much faster.
Now open a browser and paste the url from output into a browser. Congratulations, you’ve just created and deployed your first serverless service and exposed it to the world on an HTTP endpoint.
What just happened?
Let’s dive into what happened. Serverless created a new stack for you in your AWS account. A stack is like an environment and since you can have multiple stacks you can create one for development, one for testing and one for production or why not one stack for each pull request. Next it deployed the function as a Lambda and configured API Gateway so that when you call the GET endpoint it calls the Lambda. It also created the neccessary roles for the services to communicate with each other.
Serverless doesn’t have a magic wand to do this, instead it uses CloudFormation which is the solution that AWS provides to automate deployments. CloudFormation is quite complicated though so Serverless makes this much easier.
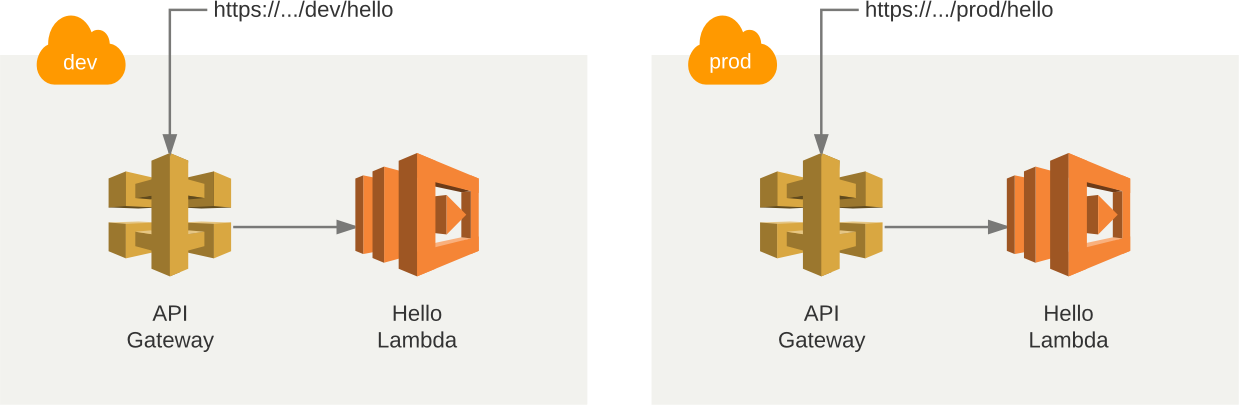
You can deploy your code to a new stack by adding the --stage parameter (the default stack is dev).
serverless deploy --stage prodAfter you run this command your AWS environment will look like this.
That’s it. Now you are ready to develop your application. If you want you can call the Lambda from the command line using serverless invoke --function hello and if you want to see the logs that it produces you can add a console.log statement to the handler, deploy it run it and then call serverless logs --function hello. When your application grows you can deploy a single function using serverless deploy function --function hello.
Where to go from here?
This was an introduction to serverless architectures and the Serverless framework and even though we’ve just created a service that scales automatically, that only costs when it’s invoked it is still a really boring application. In the following posts I’ll be showing you where to go from here. How to structure your application, how to add a web frontend to it and maybe connect it to some real devices as well. Stay put for more.